![Thomas' [insert something catchy] Blog](https://blogger.googleusercontent.com/img/a/AVvXsEhS8GpCgv6XrthlM6yk83QRMLhw3N-t-T7QC5e2xkElAyFOdKxrHBtlBm1JAcXwJ8yoREOLZIQVGzlBJYcGzbpN5MoJylSohJgXI2qWTeIuLfOupK48G8FVeH5FYa-orAALT8J3sBSWb75EiTS1xCi-ik4uhVgX9ouwjGw1KTmk2lPi258tyzaNU9vu=s800)
Not too long ago, when a new device got dropped off at IT, we’d have to go through the manual process of setting it up for the user – sometimes this was sped up by using images. Depending on your organizations workflow and what needed to be install, it would sometimes take a while before the device was ready to be used.

Fortunately, in the age of cloud computing (!), this process works a bit differently now in terms of modern desktop management..
Microsoft's Windows Autopilot is a collection of technology that allows
new devices to be preconfigured and ready for productive use by the user. IT no
longer needs to manually prepare the new device for use. Once set up, almost
the entire process – from installing software to installing Windows – is
automated.
In theory. Autopilot isn’t quite as “automatic” as its marketed (we’ll
get to that a bit later) but it is a lot more convenient than back in the “old
days”.
For a birds eye view, Autopilot allows you to perform:
- Automatic enrollment in Azure AD the first time you turn on a new device.
- Guided login and initial user setup with company branding.
- Configuration of security policies, configurations, and compliance requirements, e.g., encryption of the hard drive, installation of anti-virus software (check out my post about Intune Security Baselines - What are they and how to use them?).
- Installation of centrally managed applications i.e., Microsoft Office, Teams or Adobe Acrobat
A good description of the process being the below image that I also shamelessly stole from Microsofts own documentation.

Some of the benefits of Autopilot include:
- Device administration is simple and straightforward.
- Resellers and IT departments spend as little time as possible provisioning and managing devices.
- Decentralized implementation.
- Cost reduction via a centralized approach
- Scalable solution that can handle thousands of devices
- Device enrollment can be done automatically.
- Existing devices can be updated with new profiles and moved to Autopilot.
- Reset and install new profiles on existing devices with ease.
"Sounds awesome!” It is awesome! But you’ll need a few things first:
- Devices running Windows 10 Pro build 1703 and up.
- Azure Active Directory Premium P1 or P2 and Microsoft Intune Subscription.
And one of the following licenses (per user):
- Microsoft 365 F1 or F3
- Microsoft 365 A1, A3, or A5
- Microsoft 365 Enterprise E3 or E5
- Enterprise Mobility + Security E3 or E5
- Intune for Education Subscription
So, what are we going to be covering today?
So If you only want to configure certain devices for Windows Autopilot and use them with different profiles, the following procedure exists:
- Various dynamic groups are created for devices.
- The groups are automatically filled with the devices that have a specific "Group Tag" (more on that later).
The first step is to set up (different) provisioning profiles. These can be used, for example, to change and adapt the out-of-box experience and to determine whether the user should become a local administrator on the devices. For the technical installation, we’ll be focusing on a “basic” greenfield and cloud only setup. I’m also assuming you’ve got your tenant up ‘n running ‘n ready to go.
But just in case: Remember Configuring MDM User Scope and MAM User Scope

Preparing Dynamic Group(s) for Autopiloted Devices
First thing we need to do is make a dynamic group for your
Autopilot devices so that Intune knows which devices you want to be provisioned
and with what.
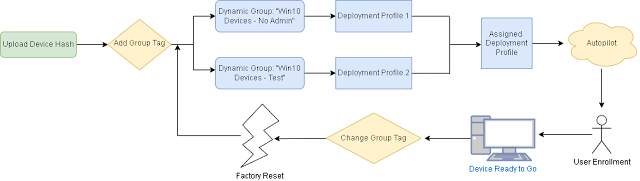
In Intune, a Device hash is uploaded, and a Group tag
is assigned to this device. A rule on Group tag fills the dynamic group, and a
Deployment policy is assigned to this dynamic group. The device is now ready
for use with Autopilot.
So create a new group, give it a name and description
and select “Edit dynamic query”.
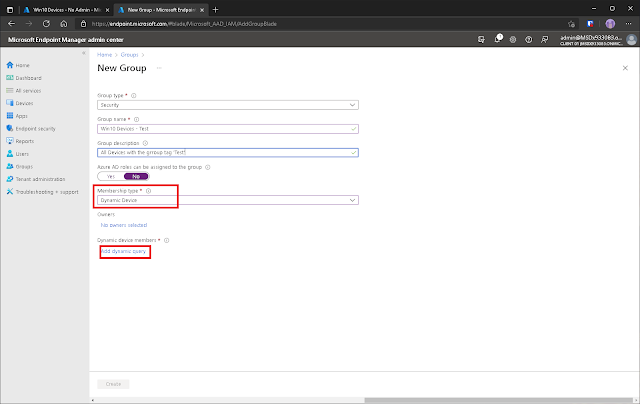
The dynamic query (aka the “rule” for the group”) will look like this:
(device.devicePhysicalIds
-any _ -eq "[OrderID]:Test")
Replace Test with the Group Tag you want to use. Then click OK > Save
> Create.

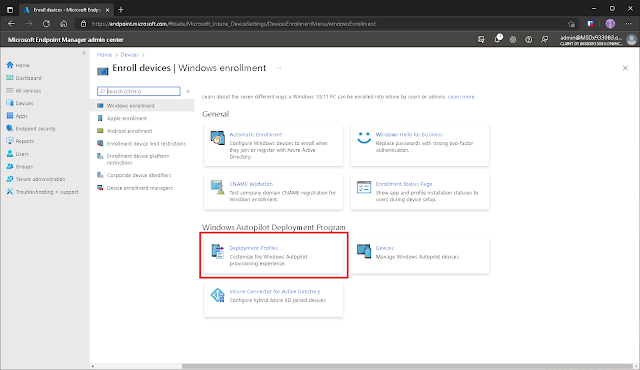
Creating a Deployment Profile
The second step is creating a Deployment Profile. Head into Intune and navigate to the Windows enrollment portal.
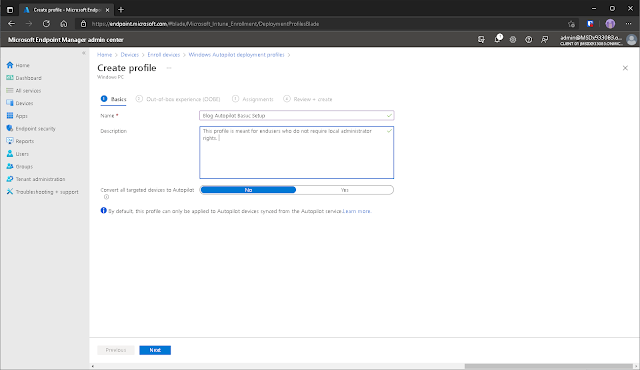
Type in a name and the description of what the profile
you’re assigning to the device does. If you want to configure all company-owned
devices for Windows Autopilot, you can do this by switching the "Yes"
button. However, only those devices that are in the assigned group are
registered for Autopilot. We’ll cover how this can be done manually per device a
bit later.
In next step, the OOBE (out of box experience) and the
deployment for the users are customized. Furthermore, the role of the users on
the device can be defined here, i.e. either administrator or standard user. Another
option is to define a device "Azure AD joined" or "Hybrid Azure
AD joined", depending on the requirements of the company. But again, we
won’t be covering hybrid set ups in this post.
We'll also be keeping the Deployment mode set to User-Device. Shared PC mode overrides a lot of registry settings so the machine can quickly load profiles and wipe them. They shut down features which your seeing as part of those policies. You can still use the shared PC policy and override it afterwards with your own configuration settings.
Note: “Apply device name template” isn’t required but will make your
life easier when it comes to managing your organizations device inventory.

Now for the assignments. I really advise against applying
this profile to all of your Windows devices. Otherwise what’s the point of
using profiles? So segment your device groupings accordingly.
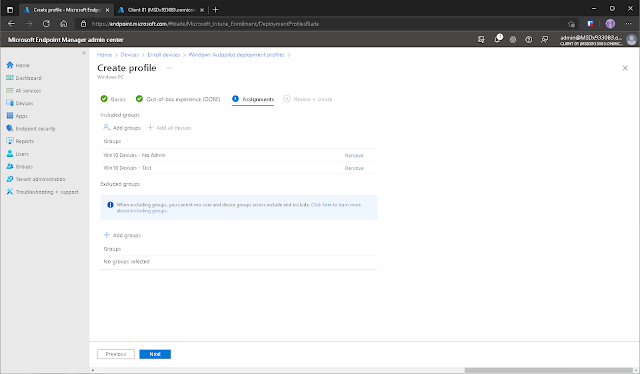
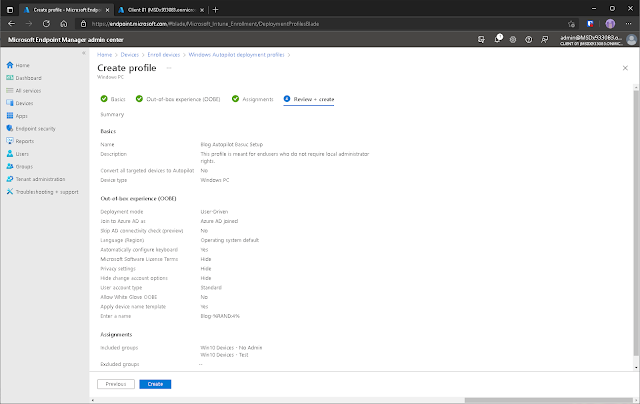
Have a look at your settings and, if you’re happy with them, click on
Create.
Now that our deployment profile is made, what next? Whereas
devices are automatically added to Azure AD when the user signs in with their
account, we need to let Autopilot know which devices we want to be want to be provisioned.
There are a few ways of doing this.
Getting your Vendor or OEM to register devices for you
The easiest, most “white glove” way to register
devices in Autopilot is to get your vendor to register the devices’ serial
number in Intune when you order your next batch. It is also possible to
register devices themselves in Microsoft Endpoint Manager. However, this
requires additional effort, as the devices must be started and registered by IT
before they are handed over to the user.
However, before you order a device from a vendor, you
should verify that that vendor supports adding devices to Intune. Another
option is to obtain devices directly from a device manufacturer (e.g. Dell,
Lenovo). Most vendors, in my experience, charge a small premium per device for
this service.
Manage existing devices
Windows Autopilot not only allows you to set up new
devices, but it also allows you to manage existing ones. After adding the
devices to Intune, they can be managed through it. As a result, existing
devices can be updated or configured with Autopilot.
If you are already using SCCM, Microsoft Intune can be
used to expand your SCCM environment. You can combine the benefits of both
solutions with this configuration, which is known as co-management. You can
control which workloads migrate from SCCM to Microsoft Intune if necessary.
Furthermore, there is the option to use Intune's various actions. The Intune
remote actions are an example of this (restart, remote control, or factory
reset).
It is also possible to add a device to Windows
Autopilot manually. This requires the device's hardware ID. This can be easily
read out using a script provided by Microsoft.
Manual enrollment
If you’re planning on manually enrolling your devices,
then I’d advise doing a fresh install with a bootlable USB (see my posts on
using MediaCreationTool or how to directly download a Windows
ISO).
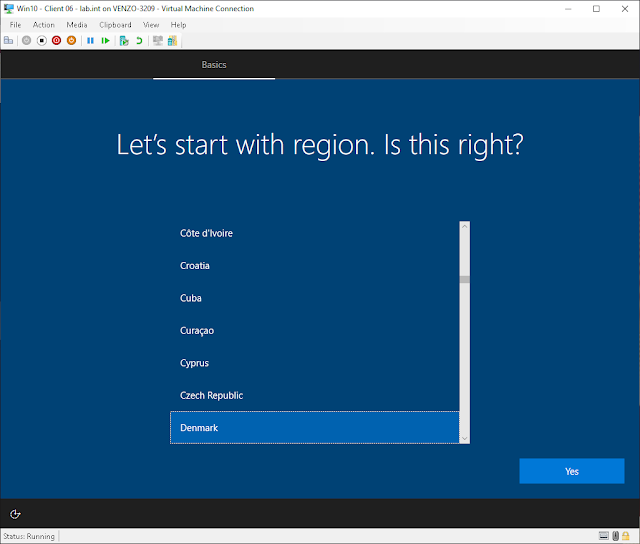
Now that you’ve done that, select your region and
keyboard and stop there! Don’t go further! Whatever you do, do not
continue setting the device up and especially don’t enroll the device by
logging in normally! Part of the Autopilot process is registering the device
automatically in Azure AD and in order to avoid any complications we want it to
be a “fresh” enrollment.
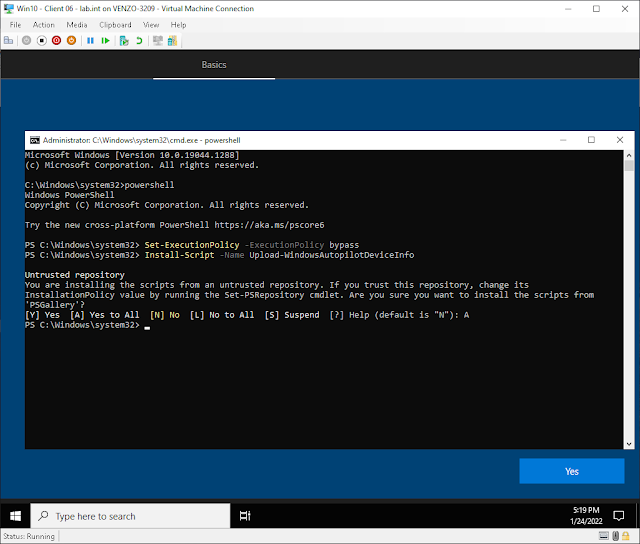
Press Shift+F10 to open up a CMD prompt and type the
following to grab the script we’ll be using to extract the devices information that
we need to push to Intune:
Set-ExecutionPolicy -ExecutionPolicy Bypass
Install-Script -Name Upload-WindowsAutopilotDeviceInfo
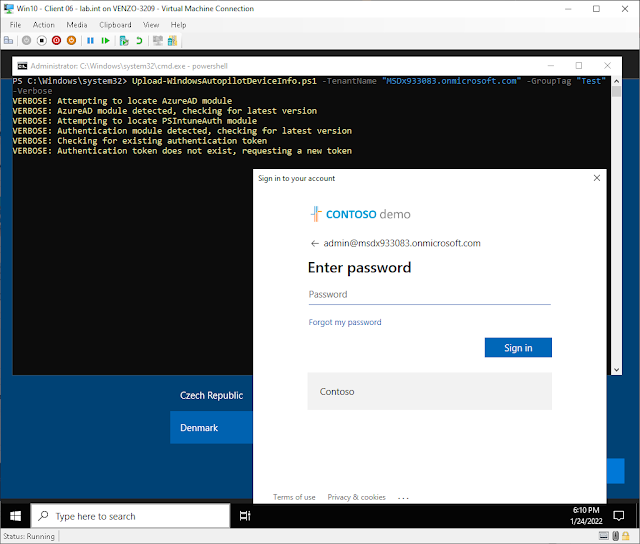
The following command calls the script and transmits
all necessary data of the device to Microsoft (replacing tenant with the
name of your… well, the name of your tenant). Also replace "Test"
with the name of the tag you decided to use in the previous ”Preparing
Dynamic Group(s) for Autopiloted Devices” section.
Upload-WindowsAutopilotDeviceInfo.ps1 -TenantName "tenant.onmicrosoft.com" -GroupTag "Test" -Verbose
The script will ask you for your credentials for
authentication. It is important that the performing user has the role
"Global Administrator" or "Intune Service Administrator".
After successful authentication, the script performs the following steps:
- Import device identity to Windows Autopilot using the Intune Graph API
- Synchronize between Microsoft Intune and Windows Autopilot
- And note the groupTag
Wait until you can see the device appear in Autopilot
before rebooting. It should happen pretty much straight away but sometimes you
need to give it a few minutes.
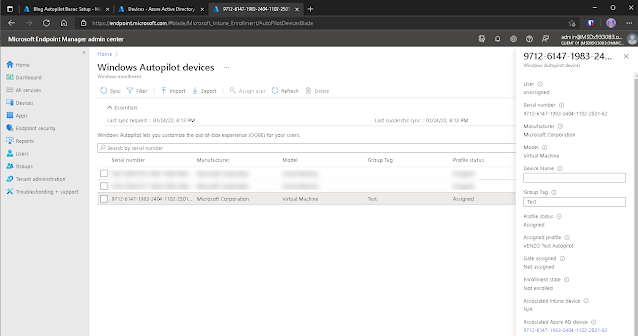
And there you have it!
The device is ready to be logged into by your user!
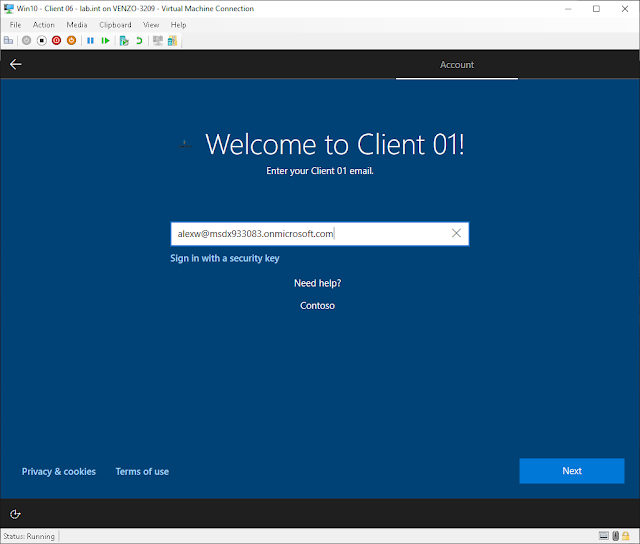
So to cap things off, here are the three ways you can register a device in Autopilot:
- Users can start the device, connect it to the Internet, and automatically receive their provisioning profile and corresponding software if it is completely new, has entered Windows Autopilot, and is tagged with a tag.
- What we went over under “Getting your Vendor or OEM to register devices for you”. The admin just assigns a group tag and the device is automatically provisioned with a profile and group.
- If you manually add an older device, you can simply reset it to factory settings and restart it. The configured profile is used here as well, just as it is with new devices.
Our focus was on how to manually register a device in Intune but I just wanted to quickly end this off with what I think is really cool about Group Tags. Since the 1911 service release of Intune , it’s now possible to change the group tag of Autopiloted devices. Previously, this could only be accomplished by removing the device hash and re-importing the device hash.
This modification allows you to change the deployment
profile by simply changing the group tag and resetting the device. To modify
the deployment profile, first modify the Group Tag and then reset the device.
The procedure will now be repeated.
Hope you’ve found this guide useful and happy trails,
kids!