There are many
scenarios where credentials from on-premises Active Directory environments are
synchronized with Azure Active Directory. Credentials from on-premises Active
Directory environments are synchronized with Azure Active Directory in a
variety of scenarios. In addition to single sign-on, such synchronization is
used for the use of cloud resources in Microsoft Azure or Microsoft 365, as
well as for the use of Microsoft Endpoint Manager. Microsoft's Azure AD Connect
tool is used to perform synchronization. Install the tool on a network server,
connect to Microsoft Azure, and then synchronize the data.
User accounts
can be synchronized between on-premises Active Directory (on-premises) forests
and Azure Active Directory using Azure AD Connect.
Password hashes can also be synchronized on demand so that Azure AD user accounts can be used to authenticate to Azure and Microsoft 365 resources. Users are not required to re-authenticate, but their credentials on the local machine are transferred to Azure.
<# ----- Skip this block if you
don’t want to read my whining about an unexpected invoice
This can be dangerous if you’re an
inattentive tinkerer like me! I once had a received an unexpected $200 invoice
because I’d set up a Bastion host to my home network and forgot that there’s a
difference between stopping a VM and decommissioning a VM… as
well as cocking up the cost alert that I thought I’d set up which was
supposed to cap my PayG subscription.
I managed to talk my way out of it I cried so much to Azure support that
they showed mercy by waiving the fee (it probably helped that it was a few days
before Christmas too 😅) but there is no guarantee that
you will be as lucky! It is completely at their discretion!
The really dumb thing is that I
actually have Microsoft Partner Network subscriptions with free Azure credit
AND access to CDX tenants through work (shout out to the homies at VENZO! 😉) so, there was really no need reason for me to
use a PayG sub other than being too lazy to move the subscription over to my
home tenant.
Oh well. Live and learn. ------ #>
What do you need?
To use Azure AD
Connect, you’ll (of course) need a subscription to
Microsoft Azure. An Azure AD instance is free to setup and use. You’ll need a credit card
but don’t worry about being charged for anything unless you go out of your way
to select additional services to activate. If you haven’t previously used your
credit card before, then you might as well sign up for the free trial.
Buyer beware; Microsoft has clamped
down on being able to sign-up for multiple free trials using the same credit
card number so I suggest taking advantage of the free trial while you can to check
out some of the other cool stuff Azure is capable of! Because once the trial is
over, your subscription switches over to a Pay-as-you-Go model.
The methods we’ll be going over aren’t
necessarily exclusive to homelab usages and definitely also apply to “real”
grown up Windows environments - but that’s the term I’m using since I’ll be
posting screenshots from a virtualized environment.
An Active Directory Domain
Controller is also needed since… well, we’re connecting an on-premise solution
to Azure and you can’t have an on-premise solution without some sort of controller
for you domain. For security
reasons, the installation should never be done directly on a domain controller,
but it is possible. And since this is a homelab for testing purposes, we’ll be
blowing caution to the wind since hey we’re using throw-way stuff here,
right?
As to accounts, you will need:
Xxx A Global Administrator Account
for your Azure tenant.
Xxx A Enterprise Administrator
account for your Active Directory Domain (if you are using Express Settings.
More on that later).
Moving on; Azure AD Connect stores
the data in a SQL database before synchronization. By default, SQL Server 2012
Express LocalDB is used here. Azure AD Connect requires a graphical user
interface. Installation on a core server running Windows Server 2016/2019 is
not possible.
If you don’t already have your
Windows Server VM set up (or don’t know how), read my A Quick 'n Dirty Guide to Setting up a Windows Server Lab guide.
Setting it up
Azure AD Connect setup starts from
the Azure portal. The menu item "Azure Active Directory" is available
here. Below "Azure Active Directory" you will find "Azure AD
Connect". Here you can can also download the MSI file that you need to
install as well as see the domains that are already connected - but since this
is a freshly created tenant, there are no domains. and.
Alternatively you can also download Azure ADConnect directly from the Microsoft Download Center.
Once you’ve downloader the
installer.. well, you know what to do. After you’ve done what you know to do
launch the AD Connector tool.
After you have confirmed the license terms, you can
use the Express Settings page to select whether you want to use the wizard's
default settings or customize the setup. Most of the time, the express settings
are sufficient. You sign in to Azure AD after selecting the Express settings.
There are, of
course, many reasons why you would choose not to use the Express settings.
Reasons such as:
- You have more than 100,000 objects in your on-premises Active Directory.
- You have multiple forests.
- You use (or plan to use) federation or pass-through authentication for user sign-in.
- You do not have
access to a Enterprise Administrator account.
- And a few other reasons you can read more about here.
Enter your Azure AD credentials.
Most of the time, the connection should be established without incident. For
troubleshooting tips on connection issues, see the Troubleshoot: Azure AD connectivity page. If the connection is successful, the next step
is to enter the on-premises Active Directory credentials. The wizard
double-checks the successful connection here as well.
And now your Enterprise Administrator
credentials:
The AD Connect wizard then checks to
see if the UPN suffixes of the on-premises Active Directory forest also exists
in Azure AD. If you want to ensure that users can sign in to Azure AD with
their on-premises login to Active Directory without re-entering credentials,
the suffixes they use should be present in both environments.
However, you can also continue without
adding the UPN to your cloud tenant. For now, we’ll go without.
The wizard then checks whether to
proceed with the setup. The individual actions are displayed in the window:
The installatlon continues to set our Azure AD Connect up.
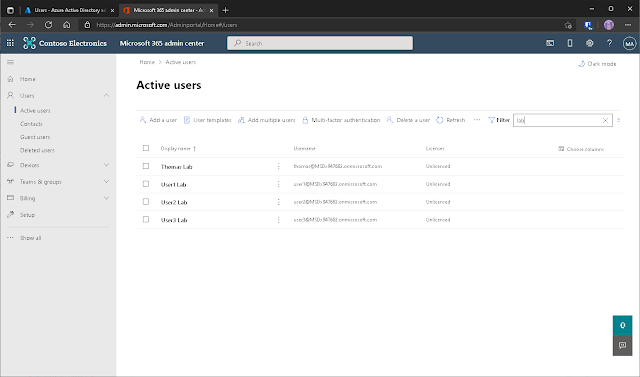
Once the wizard is complete, our On-Premise/Active
Directory users should appear in the Microsoft365 admin center. The On-Premise/Active Directory Users should display the
users from the on-premises Active Directory. Below are several dummy users (plus
an additional admin account) I made for purpose of demonstrating the (hopefully!
🤞) success sync.
All done! On-premise at least.
Let’s see if those users can be found in in the cloud.
Looks like it!
Users also appear in the Azure web portal. The Azure
Active Directory\Users\All Userspane shows the synchronized users. Azure AD
Connect also displays the status of the sync and when the last sync took place.
Configuring Azure AD Connect
Azure AD Connect can be configured on the
server where it was installed. To do this, select the menu item whose settings
you want to change and then click "Next" The appropriate settings can
then be adjusted. Of course, before you can make any changes, you must first
log in to Microsoft Azure. The credentials of the account that logged on to the
computer are used to login to Active Directory. The Azure AD Connect
configuration can be exported to a JSON file via the menu item "View or
export current configuration".
Congratulations! You know have a hybrid active
directory between your On-Premise and Azure!
Well, I think that just about does it for this
post. But in the future we’ll cover more stuff related to hybrid environments,
like:
- Adding the On-Premise UPN (lab.int) to Azure
- Hybrid Active Directory Joined Devices (HAADJ)
- Pass-through authentication sign-on
- And more!
In the meanwhile, the best way to learn is by
absolutely destroying homelabs and deliberately trying to break them as
much as you can so you can learn how to build them up again. Because even
though VM snapshots are a great fallback for when you get really stuck –
out there in the real world (read: production environments and brownfields) you
will very rarely get to just do a start-over.
Have fun!
![Thomas' [insert something catchy] Blog](https://blogger.googleusercontent.com/img/a/AVvXsEhS8GpCgv6XrthlM6yk83QRMLhw3N-t-T7QC5e2xkElAyFOdKxrHBtlBm1JAcXwJ8yoREOLZIQVGzlBJYcGzbpN5MoJylSohJgXI2qWTeIuLfOupK48G8FVeH5FYa-orAALT8J3sBSWb75EiTS1xCi-ik4uhVgX9ouwjGw1KTmk2lPi258tyzaNU9vu=s800)


