Ransomware is one of, if not the most, dangerous threat to organizations, and smaller businesses sometimes lack the resources to implement a security solution. Cyber attack threat scenarios have become more complicated than ever. Organizations with limited resources attempt to keep up with the going-ons while ensuring they have a zero-trust security policy that adapts in response to emerging threats and their own organizational needs.
However, the destination remains one of the
most frequently targeted sites. New malware and ransomware are among the most
prevalent dangers to these endpoints. Ransomware will continue to be a problem
in the second half of 2021, and new, more sophisticated attacks will emerge.
The financial harm to enterprises is growing, and the impact is felt not just
in the private sector, but also in public infrastructure and a variety of
industries.
Microsoft
security researchers have seen a nearly 121% increase in enterprise ransomware
infections between July 2020 and July 2021 (source: Introducing Microsoft Defender for
Endpoint Plan 1 - Microsoft Tech Community).
So what
does Microsoft have to say to this?
At least they’re
trying!
Microsoft
Defender for Endpoint
“Microsoft Defender for Endpoint is an
enterprise endpoint security platform designed to help enterprise networks
prevent, detect, investigate, and respond to advanced threats. Defender for
Endpoint provides advanced threat protection that includes antivirus,
antimalware, ransomware mitigation, and more, together with centralized
management and reporting.” (thanks for the introduction Microsoft docs).
Since August 2021, Defender for Endpoint has
been split between two plans:
- Plan 1 is designed for smaller businesses with limited resources searching for a security solution for their environment.
- Plan 2 contains everything that was part of Defender for Endpoint previously.
With Microsoft Defender for Endpoint P1, you
get the following core features:
- Cloud-based anti-malware with built-in AI that stops ransomware, known and unknown malware and other threats right from the start.
- Attack surface reduction capabilities that alert the device, prevent zero-days, and provide granular control over access and behavior on the endpoint.
- Device-based access control that provides an additional layer of data protection and security breach prevention, enabling a zero-trust approach.
Whereas Microsoft
Defender for Endpoint P2 includes:
- Endpoint Detection and Response providing added protection when Microsoft Defender Antivirus is running in passive mode.
- Automated Investigation and Remediation featuring advanced protection from security breaches and attacks.
- Automated Investigation and Response which significantly lowers the time taken to remediate an attack, ensuring the business can get back online more quickly.
As the
capabilities in Plan 2 are AI-driven, rather than definition based,
organizations will be ahead of, and protected against, the latest malware,
threats, and zero days.
Onboarding
our devices to Defender for Endpoint
There are several ways you can on-board devices
into Defender for Endpoint:
- Local Script: If you're onboarding a few devices, you can choose this method. Learn more about onboarding with a local script
- Intune: You can use Microsoft Endpoint Manager (MEM), which includes Microsoft Intune, to onboard all your organization's devices. Learn more about onboarding with MEM
- Group Policy: If your organization is using Group Policy to configure devices, you can choose this method. Learn more about onboarding with Group Policy
- System Center Configuration Manager (SCCM)/Microsoft Endpoint Manager (MEM): This option is for on-premises environments. Learn more about onboarding with SCCM onboarding with SCCM
- VDI onboarding scripts: If you're using virtual desktop infrastructure (VDI) devices, use this method to onboard them. Learn more about onboarding VDI devices
We’ll be looking at the first three. Namely the
Intune way; the local script way; and the Group Policy way. Let’s start with
the Local Script method.
Local Script on-boarding
Microsoft has regressed from saying that this
onboarding method can only be used on up to 10 devices to saying that the
script is for testing purposes. This is due to the data reporting frequency is
set higher than with other onboarding methods when onboarding using a local
script.
Now I agree with Microsoft that this method is optimized
for onboarding a single machine and should not be used for large scale
deployment but for older, more brownfield tenants, you want this option to be
available. Now that said, the onboarding script does reference TelemetryCriticalOptions
but I’m not sure if that’s defining the telemetry option or is just the name of
the variable EventSourceOptions is calling but I’d bet
dollars-to-doughnuts it’s the former and the other telemetry options just
aren’t documented. In which case you should, in theory, be able to find out the
right variable for the telemetry source you want.
Regardless, I haven’t tried. Because this
method is just for testing and shouldn’t be used widespread. But with
that bit of throwaway theory aside…
From the Microsoft 365 Security Portal, navigate to Settings > Endpoints
> Device management > Onboarding.
Go to Onboarding > Select the Local
Script option and then the Download onboarding package
option.
Open the script in an elevated prompt as an
administrator.
Running the script on a device creates a trust
with Azure Active Directory (Azure AD) and enrolls the device with Microsoft
Intune.
And you should see the device in Security Center 😊,
Endpoint Manager / Intune
Microsoft Defender for Endpoint integrates
seamlessly into Intune. At least in theory. Instead of running a script manually,
or pushing a group policy out on-premises, this is the cloud solution.
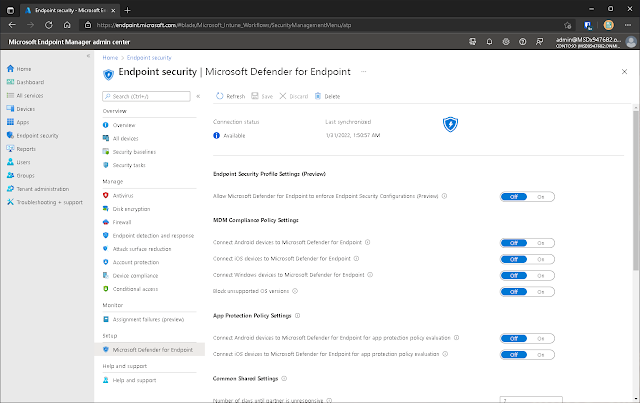
But if you go to Intune > Endpoint
Security > Microsoft Defender for Endpoint; you’ll first be met
with this sorry status 😥.
So, first you need to activate the Intune
integration once during the initial setup and your reports will flow into Intune.
Head to Microsoft 365 Security Portal and select Settings > Endpoints
>Advanced features. For Microsoft Intune connection, choose On,
and Save preferences.
Now if
you go to Intune > Endpoint Security > Microsoft
Defender for Endpoint; you’ll first be met with this happy status 😀.
Now we need to create a Device Configuration
Profile to let our Intune devices know they need to be onboarded to Defender
for Endpoint. So, while still in Intune, select Endpoint security > Endpoint
detection and response > Create Policy. For Platform, select Windows
10 and Later. For Profile type, select Endpoint detection and response,
and then select Create.
On the Basics page, enter a Name and
Description (optional) for the profile, then choose Next. On the Configuration
settings page, configure the following options for Endpoint Detection and
Response:
- Block sample sharing for all files: Returns or sets the Microsoft
Defender for Endpoint Sample Sharing
- Expedite telemetry reporting frequency: For devices that are at high risk,
Enable this setting so it reports telemetry to the Microsoft Defender for
Endpoint service more frequently.
Push the device configuration out to whatever
groups; the same way as you would push anything else out via Intune.
Have a look in Security Center and see if your
devices are on-boarded.
To further validate if the devices are piping
info through to Security Center, run the following in an elevated prompt, and
an alert should pop-up in Security Center within the next 10-15 minutes:
New-Item -Path " C:\test-MDATP-test"
-ItemType "directory"; powershell.exe -NoExit -ExecutionPolicy Bypass
-WindowStyle Hidden $ErrorActionPreference = 'silentlycontinue';(New-Object
System.Net.WebClient).DownloadFile('http://127.0.0.1/1.exe',
'C:\\test-MDATP-test\\invoice.exe');Start-Process
'C:\\test-MDATP-test\\invoice.exe'
Group Policy on-boarding
Instead of running the script manually, this
method utilizes your on-premises ADDC infrastructure to push the on-boarding
script out automatically. But if you’re reading this, you probably already know
that, and are reading my substitute Lorem ipsom introductory block script 😉.
From the Microsoft 365 Security Portal, navigate to Settings > Endpoints
> Device management > Onboarding. Group Policy and
download the onboarding package.
Unzip the contents of the.zip file to
a shared, read-only area that the device can access. There should be a folder
called OptionalParamsPolicy and a file called WindowsDefenderATPOnboardingScript.cmd
in there.
Launch the Group Policy Management
Console (GPMC), and either create a new GPO or right-click the Group Policy
Objects you want to customize.
Navigate to Computer
configuration > Preferences > Control panel > Right-click
Scheduled Tasks.
Navigate to the General tab in the Task window that appears. Under Security Options, select Change User or Group and enter SYSTEM, then select Check Names and OK.
NT AUTHORITY SYSTEM appears as the user account under which the job will run. Select Run regardless of whether the user is signed in or not, and then tick the Run with highest rights check box.
Enter a suitable nme for the
scheduled task in the Name area (for example, Defender for Endpoint Deployment).
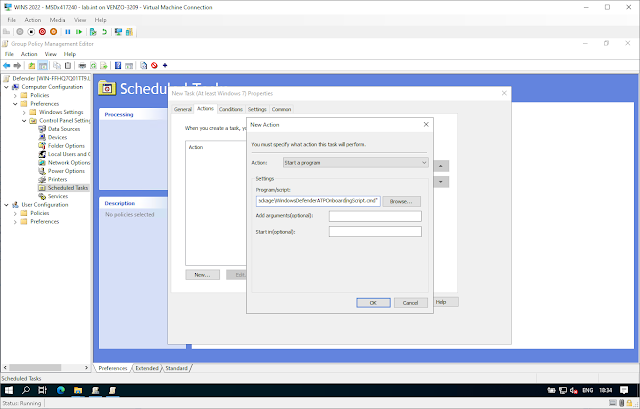
Navigate to the Actions tab and click New... In the Action field, make sure
that Start a program is chosen. Enter the UNC path of the shared
WindowsDefenderATPOnboardingScript.cmd file, using the file server's fully
qualified domain name (FQDN).
In my quick ‘n dirty homelab style, I made a shared folder so my path looks like this:
\\WINS2022 \Users\Administrator\Documents\PUBLIC\WindowsDefenderATPOnboardingPackage\WindowsDefenderATPOnboardingScript.cmd
Select OK and close any open GPMC
windows. To link the GPO to an Organization Unit (OU), right-click and select
Link an existing GPO. In the dialogue box that is displayed, select the Group
Policy Object that you wish to link. Click OK.
![Thomas' [insert something catchy] Blog](https://blogger.googleusercontent.com/img/a/AVvXsEhS8GpCgv6XrthlM6yk83QRMLhw3N-t-T7QC5e2xkElAyFOdKxrHBtlBm1JAcXwJ8yoREOLZIQVGzlBJYcGzbpN5MoJylSohJgXI2qWTeIuLfOupK48G8FVeH5FYa-orAALT8J3sBSWb75EiTS1xCi-ik4uhVgX9ouwjGw1KTmk2lPi258tyzaNU9vu=s800)


