![Thomas' [insert something catchy] Blog](https://blogger.googleusercontent.com/img/a/AVvXsEhS8GpCgv6XrthlM6yk83QRMLhw3N-t-T7QC5e2xkElAyFOdKxrHBtlBm1JAcXwJ8yoREOLZIQVGzlBJYcGzbpN5MoJylSohJgXI2qWTeIuLfOupK48G8FVeH5FYa-orAALT8J3sBSWb75EiTS1xCi-ik4uhVgX9ouwjGw1KTmk2lPi258tyzaNU9vu=s800)
A few months ago, I found myself setting up an on-prem server rack with one of my “Off-The-Shelf” standard solutions. Pretty easy job but what took the longest was the massive amount of documentation the client asked me to write up for compliance purposes. Step. By. Step.
Kids; you wouldn’t believe how much of my time
is spent in the Microsoft Suite. Especially PowerPoint and Word.
Moving on with my point… I was looking through
some old drafts to see if there was anything I could "salvage".
One of those parts was a write-up I did for a
standard SQL installation.
Now this was meant for an air gapped server
where best practice wasn’t a priority. Stability and “ease of use” was. Keeping
that in mind; this should only be used as a guide for newbs! Just kidding. Kind
of. We all need to start somewhere. But you veterans will probably shake your
head at this. Particularly not using a service account AND not silo’ing privileged
accounts into tiers.
With that out of the way!
Step 1: .net Framework 3.5 Validation
Before installing the SQL service: verify that .net framework 3.5 (or above) is present in the instance. This can be done by launching the Registry Editor and navigating to:
“HKLM\Software\Microsoft\NET Framework
Setup\NDP\v3. 5\Install”
This should be a DWORD value. If that value is present and set to 1, then the correct version of the .net framework is installed.

After verifying that .net framework v3.5 (or higher) is installed, continue to the next step: Mounting the installation DVD.
Step 2: Microsoft SQL Standard 2019 Setup
Executable
Once the installation media is loaded; execute
D:\setup.exe by right clicking and selecting “Run as administrator”.

Wait for the Setup wizard to process the
current operation.

Step 3: System Configuration Checker
When the SQL Server Installation Center has
launched, you will be presented with the following options:

Initially we should select “System
Configuration Checker” to verify that the server fulfills the necessary
requirements.

If all the rules are Passed, then click “OK” to
exit the System Configuration Checker.

Step 4: Installing SQL Stand-Alone Server
Navigate back to the frontpage of the SQL
Server Installation Center and select the “Installation” option from the menu
on the left-hand side. Then select New SQL Server standalone installation or
add features to an existing installation.

Wait for the Setup wizard to process the
current operation.

Enter the product key and click “Next >” to continue the installation.

Accept the license terms and Privacy Statement
by setting a checkmark next to the field.
Click “Next >” to continue the installation.

Click “Next >” to continue the installation.

The verification checks should show “Passed” on
three of the Rules.

For Instance Features; Select:
- Database Engine Services
- SQL Server Replication
- Full-Text and Semantic Extractions for Search
- Client Tools Connectivity
- Integration Services
- Client Tools Backwards Compatibility
- Client Tools SDK

Leave the default values for:
- Instance root directory
- Shared feature directory
- Shared feature directory (x86)
Click “Next >” to continue the installation.

Wait for the Wizard to continue to the next
screen.

Keep the default settings for “Default
instance” and “Instance ID” unchanged.
Click “Next >” to continue the installation.

Wait for the Wizard to continue to the next
screen.

Keep the default service accounts for each SQL
Server service unchanged.
Click “Next >” to continue the installation.

Keep the default settings unchanged. Click “Add
Current User” to add the default Administrator account to the SQL Server
administrators group.
Click “Next >” to continue the installation.

Double check that the configuration(s) are
correct.
Click “Install” to continue the installation.

Wait for the Wizard to complete its’ tasks.

Wait still.


Etc.
If all the operations are successful, click
“Close” and proceed to the next step.

Step 5: Verifying the
SQL Server 2019 version
Confirm which version SQL Server 2019 is installed
by navigating to “C:\Program Files\Microsoft SQL Server\MSSQL15.MSSQLSERVER\MSSQL\Binn”;
right clicking on sqlservr.exe; and clicking on the “Details” tab.

Step 6: Microsoft
SQL Server Management Studio
After the successful installation of the desired SQL services, return to the frontpage of the SQL Server Installation Center and select “Install SQL Server Management Tools”.

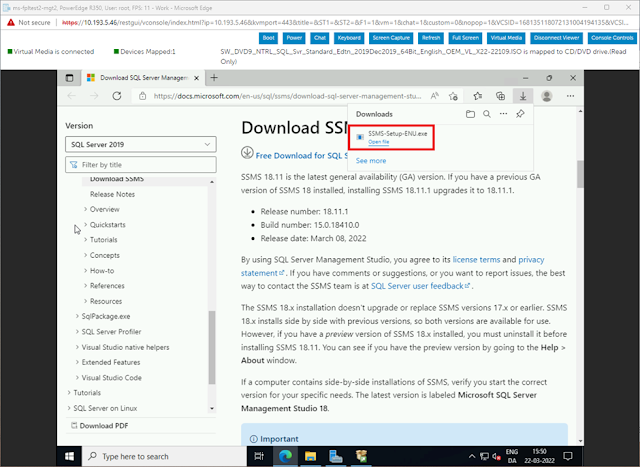
A new browser window will launch to a page
where you can download the SQL Server Management Studio (SSMS).

Download the newest version available (as the
time of writing; v. 18.11.1).

Once the download has finished, launch the SMSS-Setup-ENU
executable.
The setup Wizard will launch. Keep the default
Location unchanged and click “Install”.

Allow the Wizard to process the required
packages.

Once (if) all of the specified components have
been successfully installed, click “Restart”.

After Windows has rebooted, launch the “Microsoft SQL Server Management”
application.


Connect to the local SQL server we installed in the previous steps by clicking “Connect”.

If the SQL
service has been successfully installed (and is running) you should encounter a
database populated with the default tables as configured in the previous steps.
.

As an
additional verification, you may choose to launch services.msc and confirm that
the SQL Server MSSQLSERVER service is running

Step
7: Allowing the default SQL port: 1433
To access an instance of the SQL Server
Database Engine through a firewall, you must configure the firewall on the
computer running SQL Server to allow access. Configure the Database Engine to
use a specific TCP/IP port. The default instance of the Database Engine uses
port 1433, but that can be changed. The port used by the Database Engine is
listed in the SQL Server error log.
On the Start menu, select Run, type “WF.msc”,
and then select OK.

In the Windows Firewall with Advanced Security,
in the left pane, right-click Inbound Rules, and then select New Rule in the
action pane.

In the Rule Type dialog box, select Port, and
then select Next.

In the Protocol and Ports dialog box, select
TCP. Select Specific local ports, and then type the port number of the instance
of the Database Engine, such as 1433 for the default instance. Select Next.

In the Action dialog box, select Allow the connection, and then select Next.

In the Profile dialog box, unselect “Private”
and “Public” that describe the computer connection environment when you want to
connect to the Database Engine, and then select Next.

In the Name dialog box, type a name and
description for this rule, and then select Finish.

The new rule is now added.
