Force Installing Microsoft Defender Browser Protection on Google Chrome
Update (2024): Intune's Settings Catalog now supports some Chrome policies natively, so check there first. The ADMX ingestion approach below still works for policies that haven't made it into the catalog yet, and the walkthrough teaches you how custom ADMX ingestion works in general. That skill transfers to any vendor's ADMX, not just Google's.
But old habits die hard. Some orgs won't give up Chrome, and honestly, you're not going to win that fight. Luckily, Microsoft makes a Defender Browser Protection extension for Chrome that gets you SmartScreen-like protection on Chrome. Think of it as a compromise: not as clean as the built-in SmartScreen on Edge (which you can just toggle on via a security baseline), but it gets the job done.
The catch is that you can't just flip a switch in Intune. You need to ingest a custom ADMX template and build the OMA-URI yourself. That's the part that trips people up.
What you'll need
First, grab the Chrome ADMX template from Google: Set Chrome Browser policies on managed PCs. That page has the download link and some documentation you'll want open while you work.

Custom ADMX Ingestion in Intune
If you've worked with Group Policy, you know the drill: import an ADMX file, get new policy settings. Intune can do the same thing, but there's no "import ADMX" button. You have to go through OMA-URI, which means building the paths by hand.
The process boils down to three things:
- Ingest the ADMX template into Intune
- Build the OMA-URI for the specific policy you want
- Push it out to your devices
Easy! Right? Well, not always. Third-party templates can be tricky to work with, even when they're reasonably well documented like Google's Chrome Policy CSPs.
Building the ADMX Ingestion URI
The ingestion OMA-URI follows this pattern:
./Vendor/MSFT/Policy/ConfigOperations/ADMXInstall/AppName/SettingType/ADMXFileName
The names don't technically matter to Intune, but do yourself (and whatever poor techie inherits this later) a favor and pick something obvious. For Chrome, I use:
./Device/Vendor/MSFT/Policy/ConfigOperations/ADMXInstall/Chrome/Policy/ChromeAdmx
Ingesting the Template
Head over to Intune > Devices > Configuration profiles > + Create profile > Templates > Custom.

First row in the custom profile: paste the entire Chrome ADMX file content into the value field as a string. Yes, the whole thing. Copy and paste Ingest it.

Now you need to define a policy from that template. There are tons of policies in the Chrome ADMX (see screenshot below from one of my other tenants), but we only care about one: force-installing an extension.
Check the Google Chrome Policy CSPs docs for the full list if you want to do more.

Constructing the Policy OMA-URI (the tricky part)
This part took me the longest to figure out the first time. The policy OMA-URI starts with either:
./Device/Vendor/MSFT/Policy/Config/
./User/Vendor/MSFT/Policy/Config/
For our ExtensionInstallForcelist policy, is it user or device? Open the ADMX and find the policy definition. The class says "Both", so I'll go with device (my default when I have the choice).
./Device/Vendor/MSFT/Policy/Config/

We know the policy name, so plug that in:
./Device/Vendor/MSFT/Policy/Config/???/ExtensionInstallForcelist

That middle part (the ???) is the category path. You have to trace it through the ADMX. Find your policy's parentCategory:

The policy's parent category is "Extensions". But that category also has a parent. You need to keep tracing up until you hit the root. Find name="Extensions" in the category definitions:

Once you've got the full chain, join them with tildes. The format is AppName~Policy~parentCategory~childCategory. For our case:
./Device/Vendor/MSFT/Policy/Config/Chrome~Policy~googlechrome~Extensions/ExtensionInstallForcelist
That tilde-separated category path is where every OMA-URI I've gotten wrong was wrong. It's not documented clearly anywhere, so I ended up just tracing through the ADMX by hand each time until I had the pattern memorized.

Setting the Data Value
Now the data value. The ADMX defines this element as a list, which means the data value is a string:

If it were an integer, it'd look different:

Strings can be a bit tricky. I'll just show you. We need to enable the policy and tell it which extension to install. The data ID is "ExtensionInstallForcelistDesc" and the value format includes the extension's Chrome Web Store ID followed by the update URL:
<enabled/> <data id="ExtensionInstallForcelistDesc" value="1bkbeeeffjjeopflfhgeknacdieedcoml;https://clients2.google.com/service/update2/crx"/>

The bolded part (bkbeeeffjjeopflfhgeknacdieedcoml) is the extension's Chrome Web Store ID. You can find it in the URL when you look up the extension in the store:

Before You Hit Create
Two things that will save you a headache:
- OMA-URI values are case sensitive. Get one letter wrong and it silently fails.
- Watch for trailing spaces. If you copy-paste the URI and accidentally grab a space at the end, the policy won't find the path. I've lost time to this more than once.
Assign the profile to your target device group and let it sync. You can watch the progress in Intune > navigate to the device > Device configuration > check the State.

Click into the policy to see which settings applied and whether anything errored out. If you see -2016281112 (Remediation failed), that's almost always a typo in the OMA-URI or a malformed data value. Go back and check case sensitivity and trailing spaces first.

Did It Work?
Once it syncs, you'll see the extension installed and the browser flagged as managed. Users can't remove it, which is the whole point.


This same ADMX ingestion approach works for any third-party software that ships an ADMX template. It won't always go smoothly, particularly when the vendor's documentation is lacking (or just doesn't exist), and you'll find a lot of trial and error involved. Similar to packaging Win32 apps and figuring out what the damn uninstall flags are. But that's probably a post for another day.
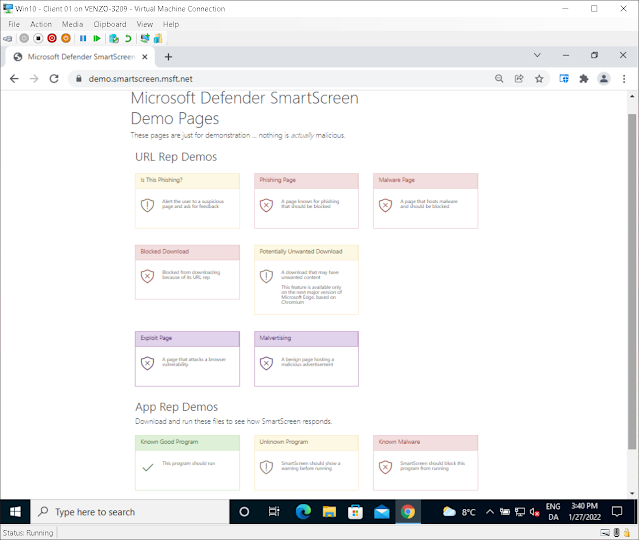
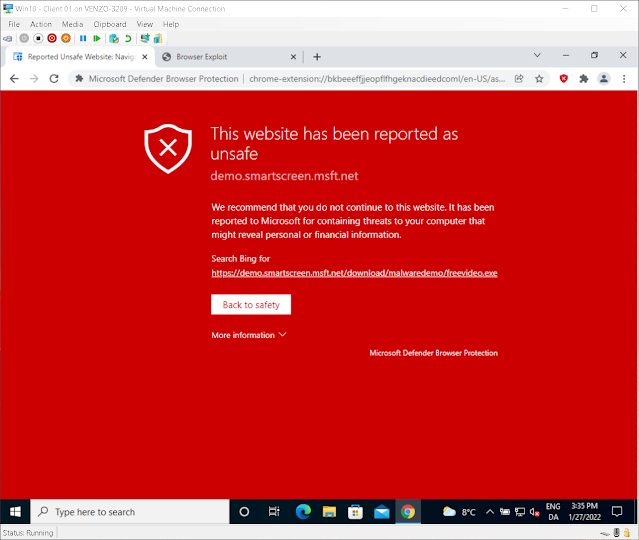
To test the extension once it's deployed, use Microsoft's SmartScreen demo page. The screenshot below shows what happens when a protected browser hits a URL with a bad reputation: