![Thomas' [insert something catchy] Blog](https://blogger.googleusercontent.com/img/a/AVvXsEhS8GpCgv6XrthlM6yk83QRMLhw3N-t-T7QC5e2xkElAyFOdKxrHBtlBm1JAcXwJ8yoREOLZIQVGzlBJYcGzbpN5MoJylSohJgXI2qWTeIuLfOupK48G8FVeH5FYa-orAALT8J3sBSWb75EiTS1xCi-ik4uhVgX9ouwjGw1KTmk2lPi258tyzaNU9vu=s800)
Azure Storage Account. Pretty cool name. So what are they? Why do you want them? How do you make them? And how do you use them? I’m glad you asked!
Just jump past the weird Dall·E generated image of "a guy in a storage room with a lot of boxes looking confused".
Confused, Dall·E. I wanted confused. Not stoned.

What different types are there?
Well... for starters you have General-purpose v1 and General-purpose v2. We'll be ignoring GPv1 and focusing on GPv2 but click here if you want to know more.
General-purpose v2 (GPv2) has the following storage types:
Blob storage: As the name suggests, Blob storage accounts are optimized for storing unstructured data, such as images, videos, and documents. Blob storage accounts offer lower costs for storing large amounts of data and support hot, cool, and archive tiers to optimize costs based on data access patterns. However, Blob storage accounts do not support other Azure Storage services like File, Queue, and Table storage.
File storage: File storage accounts are designed for storing and sharing files in the cloud, with support for both SMB and NFS protocols. File storage accounts offer high performance and low latency for file-based workloads, making them ideal for applications that require shared file access. However, File storage accounts can be more expensive than other types of storage accounts.
Queue storage: Queue storage accounts are designed for storing and processing messages in the cloud. Queue storage accounts offer high throughput and low latency for message-based workloads, making them ideal for building distributed applications. However, Queue storage accounts do not support other Azure Storage services like Blob, File, and Table storage.
Table storage: Table storage accounts are designed for storing structured NoSQL data, with support for key-value pairs, entities, and partitions. Table storage accounts offer high scalability and low latency for NoSQL workloads, making them ideal for building large-scale applications. However, Table storage accounts do not support other Azure Storage services like Blob, File, and Queue storage.
Let's get going with GPv2!
So we’re going to be using that type in this guide.
This is because its the most commonly used storage account is the general-purpose v2 storage account. It offers support for all of Azures Storage features, including Blob, File, Queue, and Table storage.
In addition, general-purpose v2 storage accounts offer better performance, s
Using Azure Storage Accounts is relatively straightforward. Here are the basic steps:
- Create a Storage Account: The first step is to create a Storage Account in Azure. You can do this using the Azure Portal or the Azure CLI.
- Choose your Storage Account type: Azure Storage Accounts come in several types, including Blob Storage, File Storage, Table Storage, and Queue Storage. Choose the one that best fits your application's needs.
- Configure your Storage Account: Once you've created your Storage Account, you can configure it to meet your specific needs. This includes setting up access policies, encryption, and other security features.
- Use your Storage Account: Once your Storage Account is set up and configured, you can start using it to store and access data. You can do this using a variety of Azure tools and services, including Azure Blob Storage, Azure File Storage, and Azure Data Lake Storage.
We’ll be going through the Portal, step-by-step, but here's a quick powershell snippet for those of you who prefer to live in their terminal. You’ll probably also want to check out the documentation as well: Create a storage account - Azure Storage | Microsoft Learn
And installing the Az.Storage module will also help.
$resourceGroupName = "<resource-group-name>"
$location = "<location>"
$storageAccountName = "<storage-account-name>"
# Create a new storage account
New-AzStorageAccount -ResourceGroupName $resourceGroupName -Name $storageAccountName -Location $location -SkuName Standard_LRS -Kind StorageV2
Otherwise keep reading and start with...
...loging in to the Azure portal and searching for "Storage account" in the search bar.

Click on "Create" to begin creating a new storage account.

In the "Basics" tab, select your subscription and resource group, then give your storage account a unique name.
Choose the location and performance tier for your storage account. Select the "General-purpose v2" account kind. Performance gives you two options:
- Standard: This uses traditional HDDs for storage.
- Premium: Uses SSDs
Basically, in a nutshell, the main difference between Standard and Premium storage is the level of performance they offer. Premium storage is designed for applications that require high performance, low latency, and high IOPS or throughput. It's ideal for workloads like database applications, virtual machines, and other IO-intensive workloads.
For now, we’re going to stick with Standard.

In regards to redundancy; If you just need basic protection, go for Locally Redundant Storage (LRS). For higher availability, Zone Redundant Storage (ZRS) is a good choice. Geo Redundant Storage (GRS) is your best bet if you need protection against outages or disasters. Finally, Read-Access Geo Redundant Storage (RA-GRS) is great for low-latency access to data across regions.

The next page,
- Requiring secure transfer for REST API operations
- Enabling storage account key access
- Setting minimum TLS version
- Configuring permitted scope for copy operations.

A bit further down, you’ll see:
- Data Lake Storage Gen2 - designed to help you organize and navigate your data more easily with its hierarchical namespace feature. Plus, it also provides file-level access control lists (ACLs), which are helpful for controlling access to files within the storage account.
- Blob storage – Nifty features like SFTP, network file system v3, cross-tenant replication, and access tiers, you can make the most out of your storage account. Just remember to enable hierarchical namespace for some of these features. If you have data that's frequently accessed and used, the Hot tier is the way to go. But, if you have data that's not accessed as often, the Cool tier may be a better fit.
- Azure Files – By enabling this option, you can store files up to 100 TiB in size. Stuff like media files, CAD drawings, scientific data, etc.

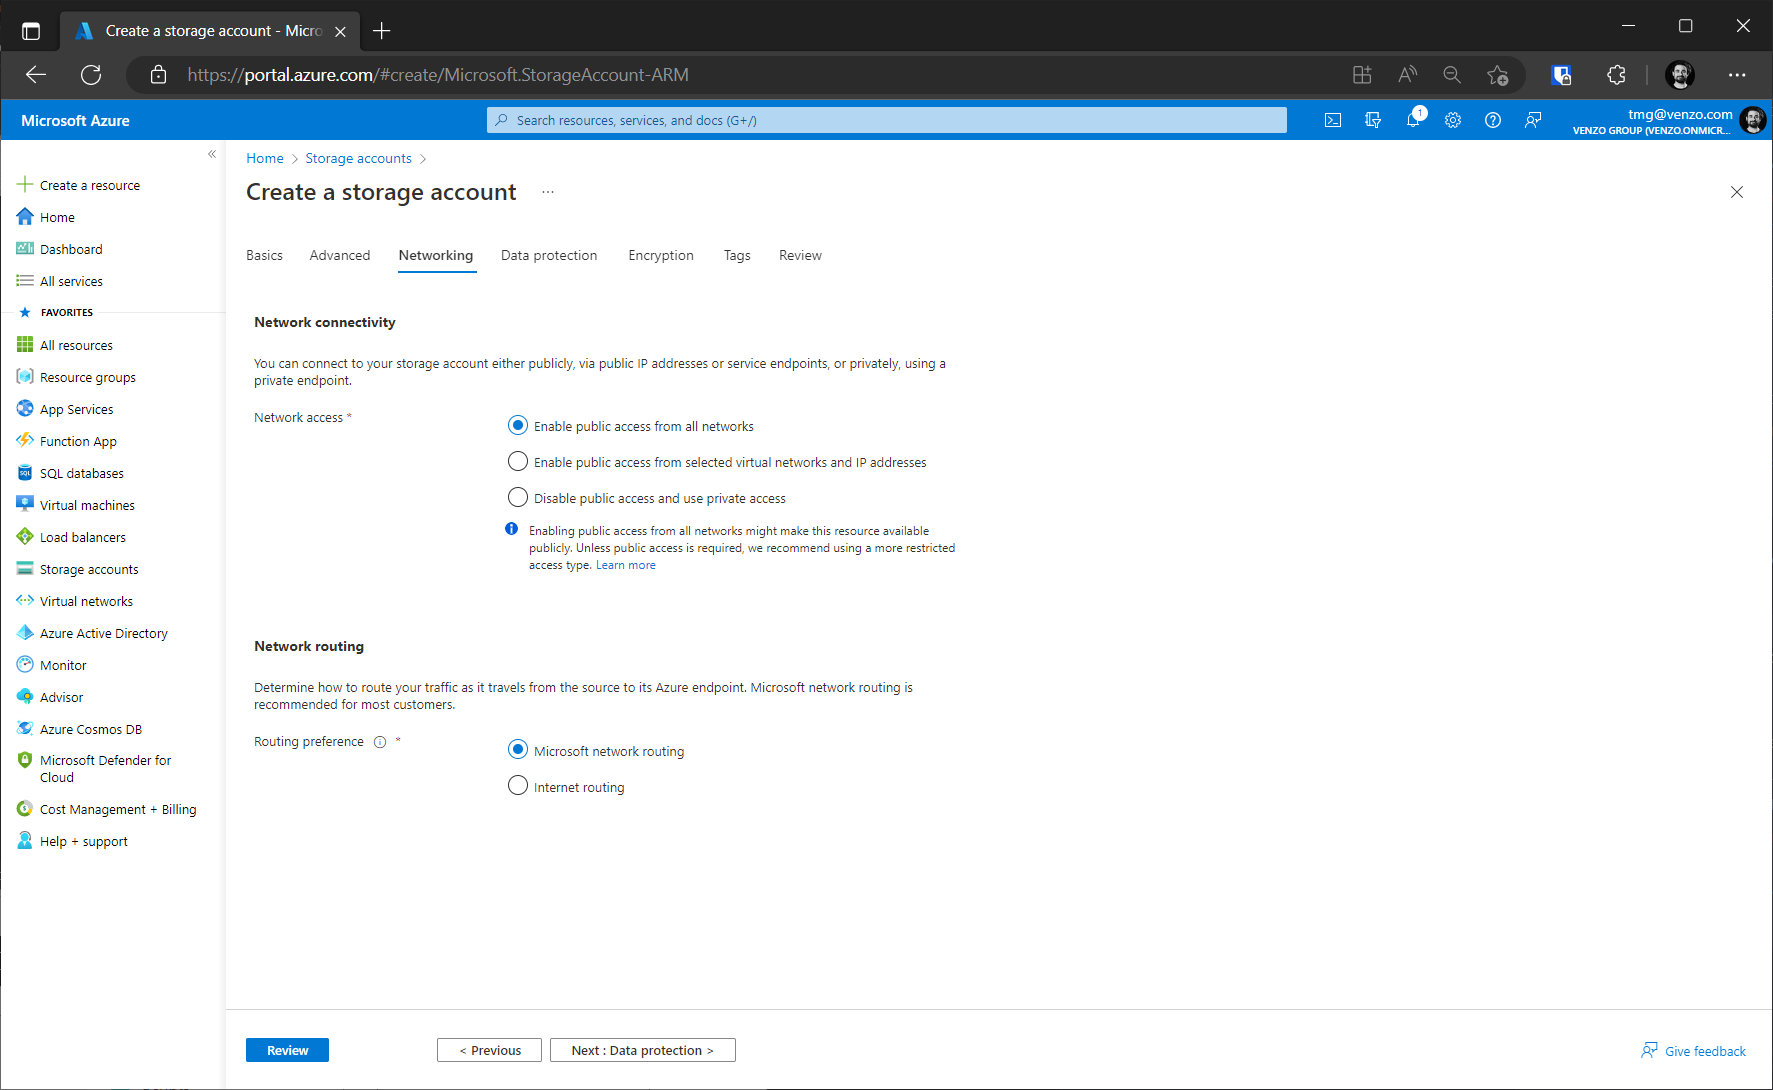
Aaaaand on the next page; Netowkring.
Azure Storage accounts can be a bit tricky when it comes to network connectivity, but don't worry, we've got you covered! There are two ways to connect to your storage account - either publicly through IP addresses or service endpoints, or privately using a private endpoint.
Be careful with public access though! Turning this on could make your resource available to anyone, which is not a good thing. Really not a good thing. So, unless you need it, stick to a more restricted access type.
Another thing to think about is network routing. You'll need to decide how to route your traffic as it travels from the source to its Azure endpoint. Most customers find that Microsoft network routing is the way to go.
Finally, you have the option to set a routing preference. This lets you choose how your traffic is routed between Azure services and your on-premises infrastructure, which can improve performance. Microsoft Peering is generally the better for most people. It’s faster, more reliable and has better security.
And now Data protection. When it comes to managing your data in Azure Storage, there are a few things to keep in mind. One of the biggest concerns is making sure you don't accidentally delete or modify your data. Nobody wants that, right?
There’s some pretty cool data recovery features like point-in-time restore, which lets you roll back one or more containers to an earlier state. But to use it, you'll need to make sure you have versioning, change feed, and blob soft delete enabled. Blob soft delete is especially nifty because it lets you recover deleted blobs, even if they were overwritten.
Then there’s Tracking/Versioning is basically like having a history of all the different versions of your blobs. So if you need to go back to a previous version, no problem! Just check the version history and you're good to go.
Next, we've got blob change feed. This feature lets you keep track of any changes made to your blobs, whether it's creating, modifying, or deleting. So if anything happens, you'll know about it and can take action.
And of course, access control is super important. One neat feature here is version-level immutability support. What does that mean? Well, it lets you set a time-based retention policy on all blob versions at the account level. So even if someone tries to delete or modify your data, you'll be able to recover it.

In Azure, your data is automatically encrypted by default using Microsoft-managed keys. But if you want to take things a step further, you can choose to encrypt your data using customer-managed keys via the Azure Key Vault.
This lets you manage the keys used to encrypt and decrypt your data, giving you more control and added security. However, once you make this choice, you can't go back, so make sure you're confident in your decision.
On top of that, you can also enable infrastructure encryption, which encrypts all data flowing in and out of your storage account using SSL/TLS protocols. This is another great way to keep your data safe and secure from prying eyes.

Next up is Tags. Now I’ve gone over Tags like a dozen times in all of my other guides. Let’s just move on.

Review and accept the terms and conditions, then click on "Create" to create the storage account.

Once your storage account is created, you can begin using it to store and manage your data.

And Bob's your uncle!

Using your new storage account
Ok, so you got yourself an Azure Storage Account - greate job! Now it's time to connect to it so you can start managing your data. There's a few ways to do this, so let's take a loook.
First off, there's the Azure Portal. It's a web-based inteface that lets you manage your storage account directly from your browser. You just log in and go to your storage account's Overview page. From there, you can mange your account settings, upload and download files, and more.
Another option is Azure Storage Explorer. It's a free tool you can download and install on your computer. It lets you manage your containers, upload and download files, and more. Just add your account using your storage account name and connection string.
Then there’s always good old PowerShell!
You can also use the Azure API if you need more control over your storage account.
But that’s a whole (very long) blog post on its own. So, keeping with the theme of this post, let’s go over the GUI. See ata storage in the menu? That’s going to be our main focus.

Let's start with containers. A container is like a folder that you can use to organize a set of files, and is a great option for storing unstructured data, such as images or videos. To upload a file, select the container where you want to store the file and click the "Upload" button. To download files from your storage account, simply select the file you want to download and click the "Download" button.

File storage is a fully managed file share service that allows you to store and share files with your applications running in Azure or on-premises. Plus, you can mount file shares on Windows, Linux, and macOS machines! That’s probably the coolest thing about this.

If yu're looking for a message queuing service, Queue storage is your go-to. A message queuing service is a type of middleware that allows different applications to communicate with each other by sending and receiving messages.
The idea behind a message queuing service is that instead of sending messages directly between applications, you send them to a message queue, which acts as a buffer. The message queue then delivers the messages to the receiving application(s) at a later time. You can use it to store messages that are processed asynchronously or for reliable interprocess communication.

Last but not least, there's Table storage. This NoSQL key-value store is perfect for storing large amounts of structured data with low latency and high availability. If you need to store data that needs to be accessed quickly and efficiently, Table storage is a great option for building fast and scalable applications.

Let’s go over an example. Here I’ve made a blob container. I’m not going to insult your intelligence by telling you to click on “Create”. But go ahead and click on “create”. Afterwards you can click on “Upload” and… upload something!

I’m not going to go over all the different features because this blog post is getting long. Really long. Like much longer than I was expecting it to be and I am getting TIRED. But hey! I will go over the tabs in the actual blob. Bexcause there aren’t too many. And they’re easy to describe. So check it out! Our uploaded file in our new blobl container!
- Overview: This tab is like a summary of the selected blob. It shows you the name, type, size, and access tier of the blob. You can also see when the blob was created and last modified, along with other properties.
- Versions: This tab lets you manage different versions of the selected blob. If you have versioning enabled for your blob storage account, you can use this tab to view and manage different versions of the same blob. It's like having a history of your blob's changes!
- Snapshots: This tab is all about managing snapshots of the selected blob. Snapshots are read-only copies of the blob that you can use to restore the blob to a previous state if needed. Think of it like a "save point" in a video game!
- Edit: This tab lets you edit the properties of the selected blob. You can change the blob's metadata, set access policies, and modify other settings. This can be useful if you need to update some information about your blob.
- Generate SAS: This tab lets you generate a shared access signature (SAS) for the selected blob. A SAS is a secure way to share your blob with other users or applications, allowing them to access the blob for a limited time. It's like giving someone a secret key to your treasure chest!

And here’s another PowerShell snippet:
$storageAccountName = "<your-storage-account-name>"
$connectionString = "<your-storage-account-connection-string>"
$containerName = "<your-container-name>"
$filePath = "<path-to-your-file>"
# Connect to the storage account using the connection string
$storageAccount = [Microsoft.Azure.Storage.CloudStorageAccount]::Parse($connectionString)
# Create a new blob client using the storage account
$blobClient = $storageAccount.CreateCloudBlobClient()
# Get a reference to the container
$container = $blobClient.GetContainerReference($containerName)
# Get a reference to the blob and upload the file
$blob = $container.GetBlockBlobReference((Get-Item $filePath).Name)
$blob.UploadFromFile($filePath)
But... what is that in the code? A connection string? The hell is that? Just keep reading... This blog post is almost over. I promise!
Connecting to your new storage account
Now that you've created your new storage account, it's time to connect to it. A connection string is what we need to enable our application or service to connect to the storage account. It contains the details needed, including the account name, access key, and endpoint URL...
Otherwise let’s go with my Step-by-Step guide for GUI. Start by clicking "Acceess keys." Unser Security + Networking.
Under "key1," click on the "Show keys" button to reveal the connection string.

That’s it! One whole step!
Or, here’s how to do it with PowerShell if you’re feeling l33t enough:
$resourceGroupName = "<resource-group-name>"
$storageAccountKey = (Get-AzStorageAccountKey -ResourceGroupName $resourceGroupName -Name $storageAccountName).Value[0]
$context = New-AzStorageContext -StorageAccountName $storageAccountName -StorageAccountKey $storageAccountKey
$connectionString = $context.ConnectionString
Conclusion
The conclusion is you now have a new storage account. Congratulations! But despite this long, long, loooooong blog post… there’s still a ton of you to learn. So off you go!
