![Thomas' [insert something catchy] Blog](https://blogger.googleusercontent.com/img/a/AVvXsEhS8GpCgv6XrthlM6yk83QRMLhw3N-t-T7QC5e2xkElAyFOdKxrHBtlBm1JAcXwJ8yoREOLZIQVGzlBJYcGzbpN5MoJylSohJgXI2qWTeIuLfOupK48G8FVeH5FYa-orAALT8J3sBSWb75EiTS1xCi-ik4uhVgX9ouwjGw1KTmk2lPi258tyzaNU9vu=s800)
And Hey! You! Yes, you! Do you remember when I wrote a post about How to Install Windows as a Hyper-V Virtual Machine? Of course you do!
And as useful as having Virtual Machines (VM) on your box is! There are other ways to use VMs. Like Azure! Azure VMs is that you don't have to worry about buying or maintaining physical hardware. Azure takes care of all of that for you, so you can focus on developing and deploying your applications or services without having to worry about the underlying infrastructure.
Like omg you can choose the operating system, hardware specifications (WOW), and network settings of your VM (gasp), and you can create as many virtual computers as you need! How baller is that?
But OK - my weirdness aside - you're going to run into Azure VMs when offloading your infra to Azure and/or apps from on-prem. Besides, it's also just damn handy having a VM with Microsofts uptime of.. well, a lot of 9s. I even have an Azure VM that acts as a jumpbox to my home network.
But enough chitter chatter. Let's get going.

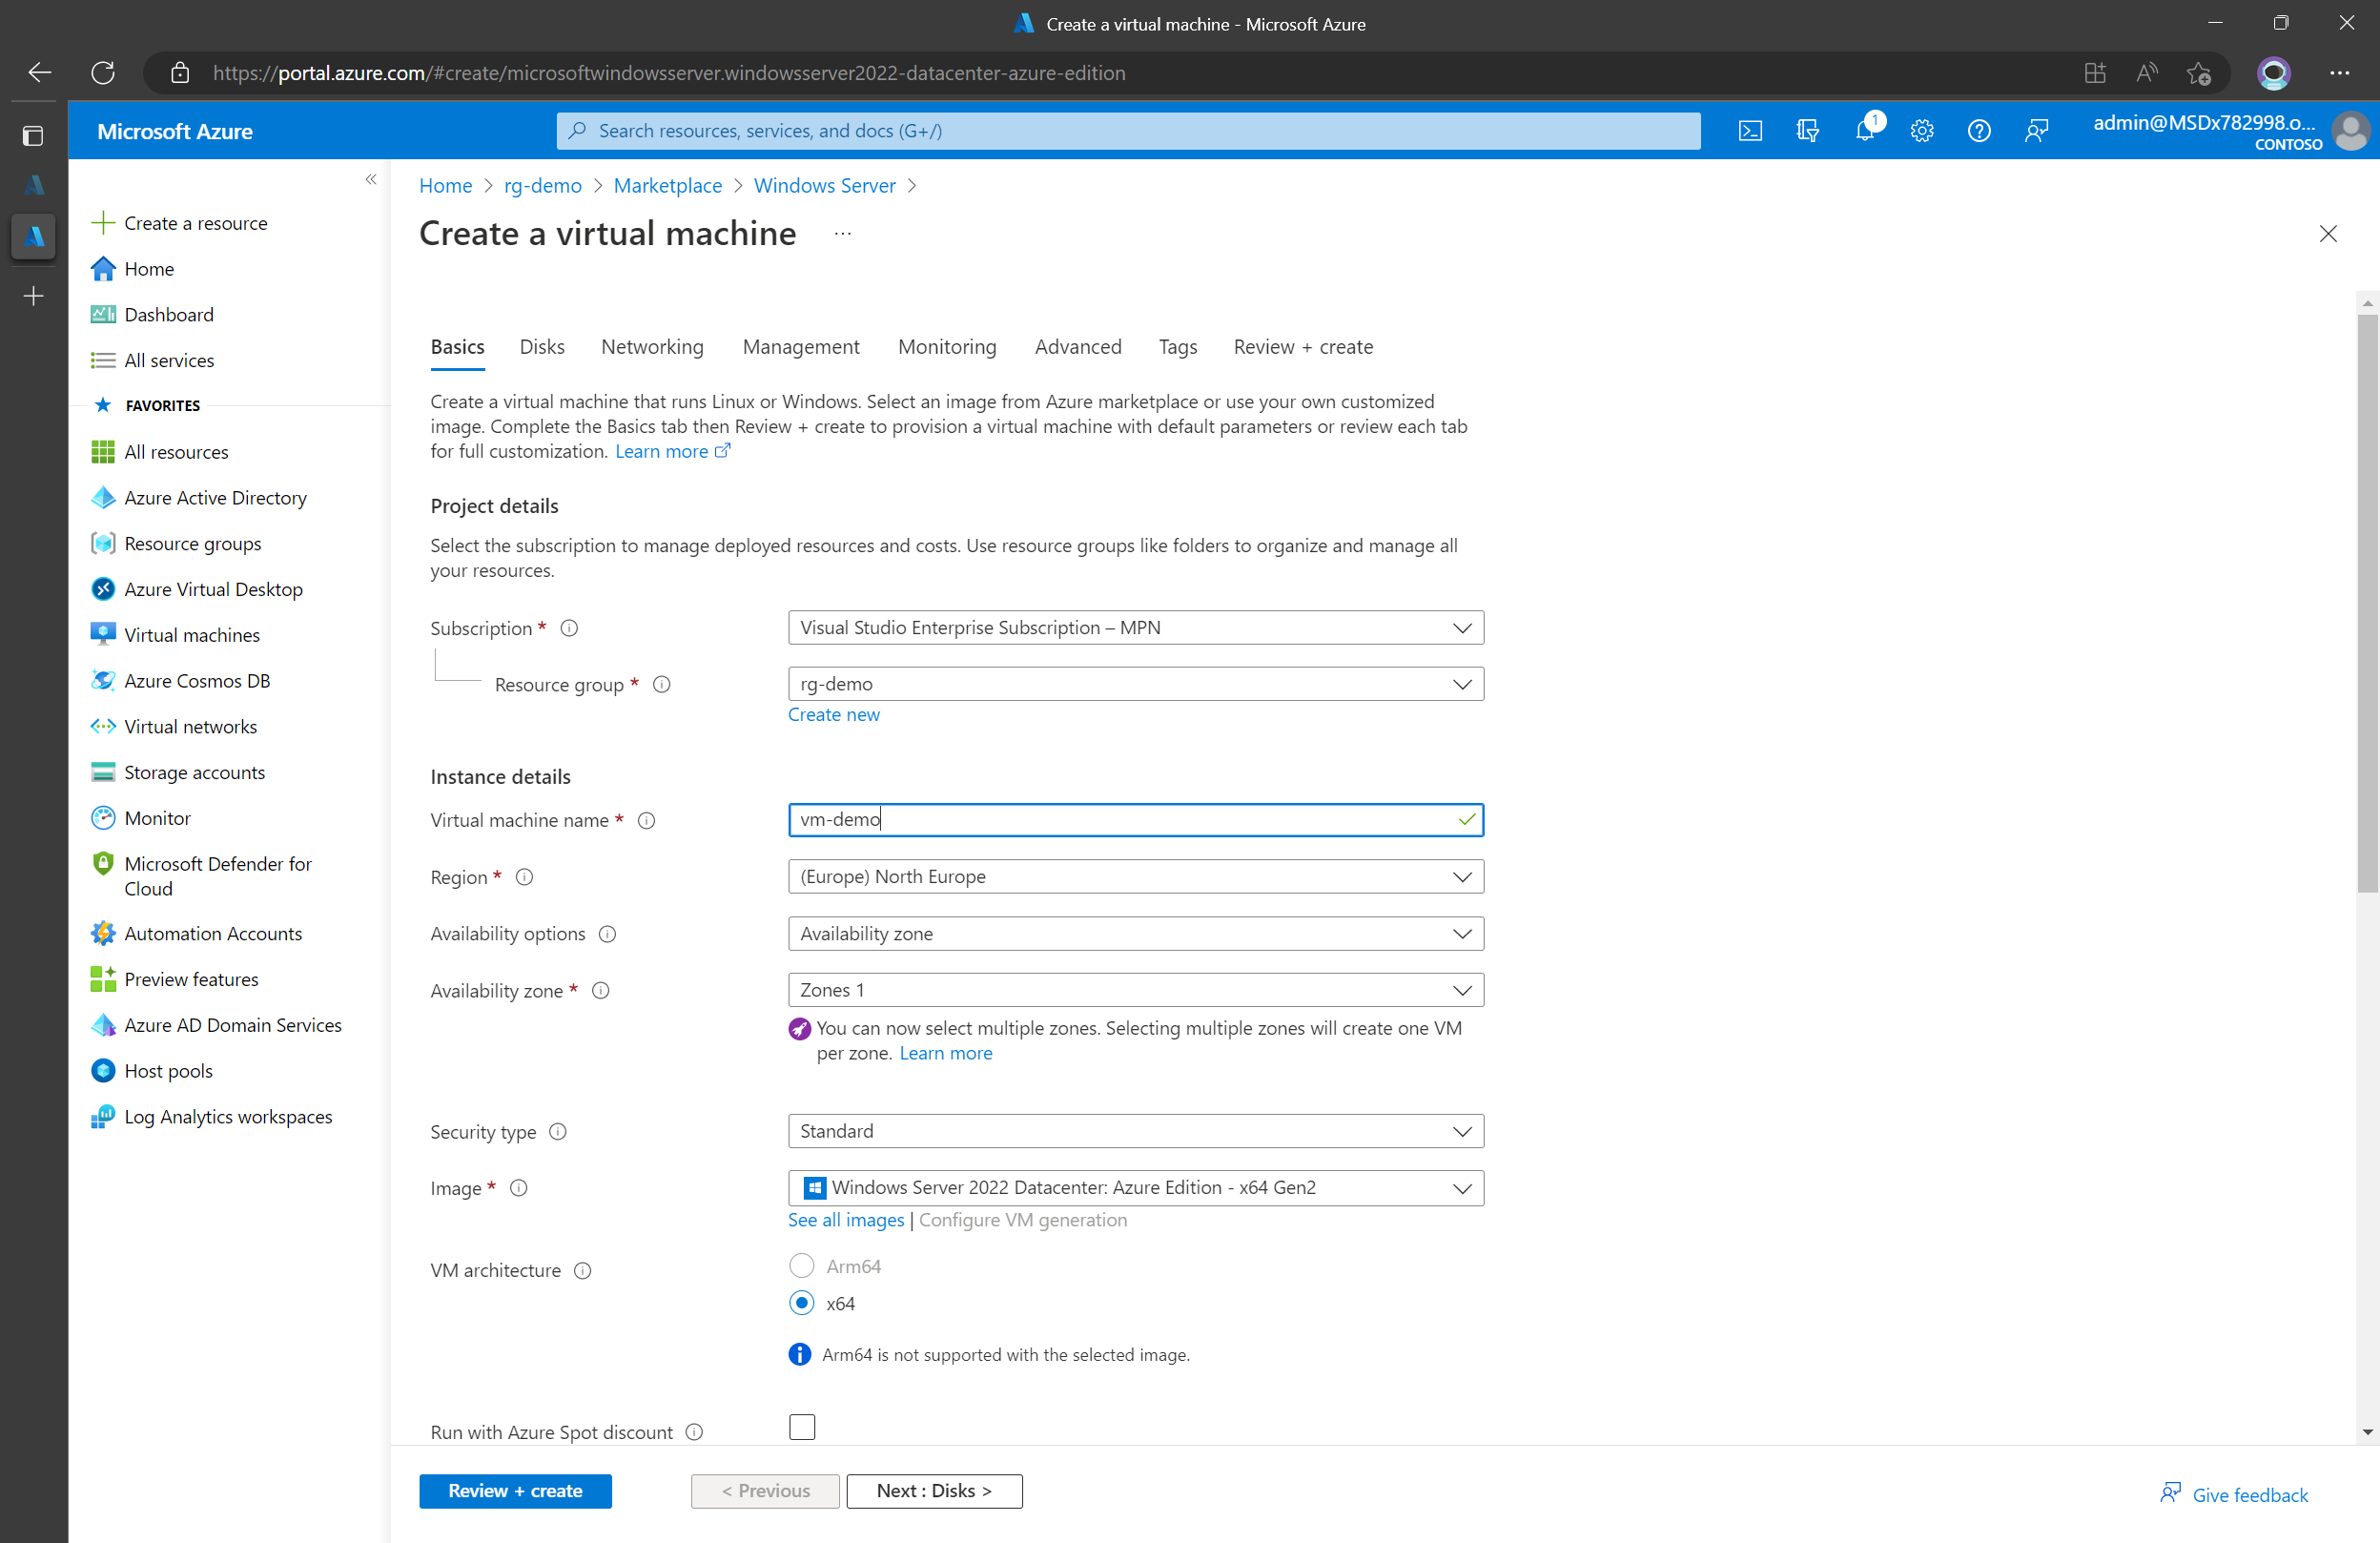
Start by signing in to the Azure portal and navigate to the resource group where you want to create the virtual machine and Click the "+ Add" button to create a new resource.

Search for whatever OS you want to use. Normally I like to use Ubuntu because it’s cheap!
But keeping with the Microsoft theme of this blog – I’m going to go ahead and choose Windows Server 2022. The GUI version! Because I can. But again, keeping costs down – and granted you don’t need some of the stuff that only the GUI version can host – you could always go with core. It really doesn’t matter in the context of this post. Aaaaand I’m rambling.
Now there is an option to “Start with a pre-set configuration” and it is useful. It’s just a bit overkill and I feel my dear reader will get more out of us going through a bit more of a manual process.

Time to enter the required information for the virtual machine, like the name, region, and VM size. Etc etc etc.
For the region, I always go with North Europe because that’s where I’m based. But otherwise you’ll want to choose a region based on things like:
- Latency: how long it takes for data to travel from one place to another. If you have users in Europe, it's best to choose a region in Europe, like Western Europe, so data can travel faster.
- Compliance: Different regions have different rules you have to follow. If you have to follow certain rules, you might need to choose a specific region. You’ll want to be particularly careful if you have anything to do with the EU because GDPR will mess you up.
- Availability: Not all regions have the same stuff. Some places might not have all the same services or might only have some services available to try out.
- Pricing: Pricing might be different in different regions. I believe Northern Europe is a teensy bit more expensive than some of the other regions but meh I’m not paying.
- Disaster Recovery: If you're using Azure to backup your data in case of a disaster, it's a good idea to choose a region far away from your main one to keep your data safe.
- Network Traffic: Different regions might have different amounts of internet traffic. This can affect how fast your data can move around.
But considering that you are most likely just starting out with Azure – you don’t have to be too concerned about that. Your main priority is probably how much this is going to set you back. I’ll let you poke around the differenct pricing options yourselves because it depends on a lot of factors
When you make a Virtual Machine (VM) in Azure, you get to choose what size it is. The size of the VM refers to how much processing power, memory, and storage it has. The sizes range from small to big, and the bigger the VM, the more expensive it is.
Each size has a different amount of processing power, memory, and storage, so you can choose the one that fits your needs best. If you're just testing something out, you might not need a big VM, but if you're running a big application, you might need a bigger one.
The pricing for the different sizes varies based on how much processing power, memory, and storage you need. The bigger the VM, the more expensive it is. So, if you need more power, you'll have to pay more money.

You might have noticed the “Run with Azure Spot discount”. Azure Spot is a way to use computing resources on Azure at a lower price. It's like getting a really good deal on something you want to buy.
Here's how it works: Sometimes, there are Virtual Machines (VMs) on Azure that are not being used by anyone. Azure Spot Discount lets you use these idle VMs at a discounted price, which can be really cheap, like up to 90% off the regular price. The reason it's so cheap is because Azure has already built the infrastructure, and you're just using the resources that aren't being used by anyone else.

The only thing to keep in mind is that you might not always be able to use the same resources all the time because other people might need them too. It's like sharing a toy - you can play with it when it's available, but you might have to give it back when someone else wants to play with it.
The option I really like to use is the “Save up to 49% with a license you already own using Azure Hybrid Benefit.” since, hey! 50% off! But then again I’m swimming in keys (thanks again, VENZO).

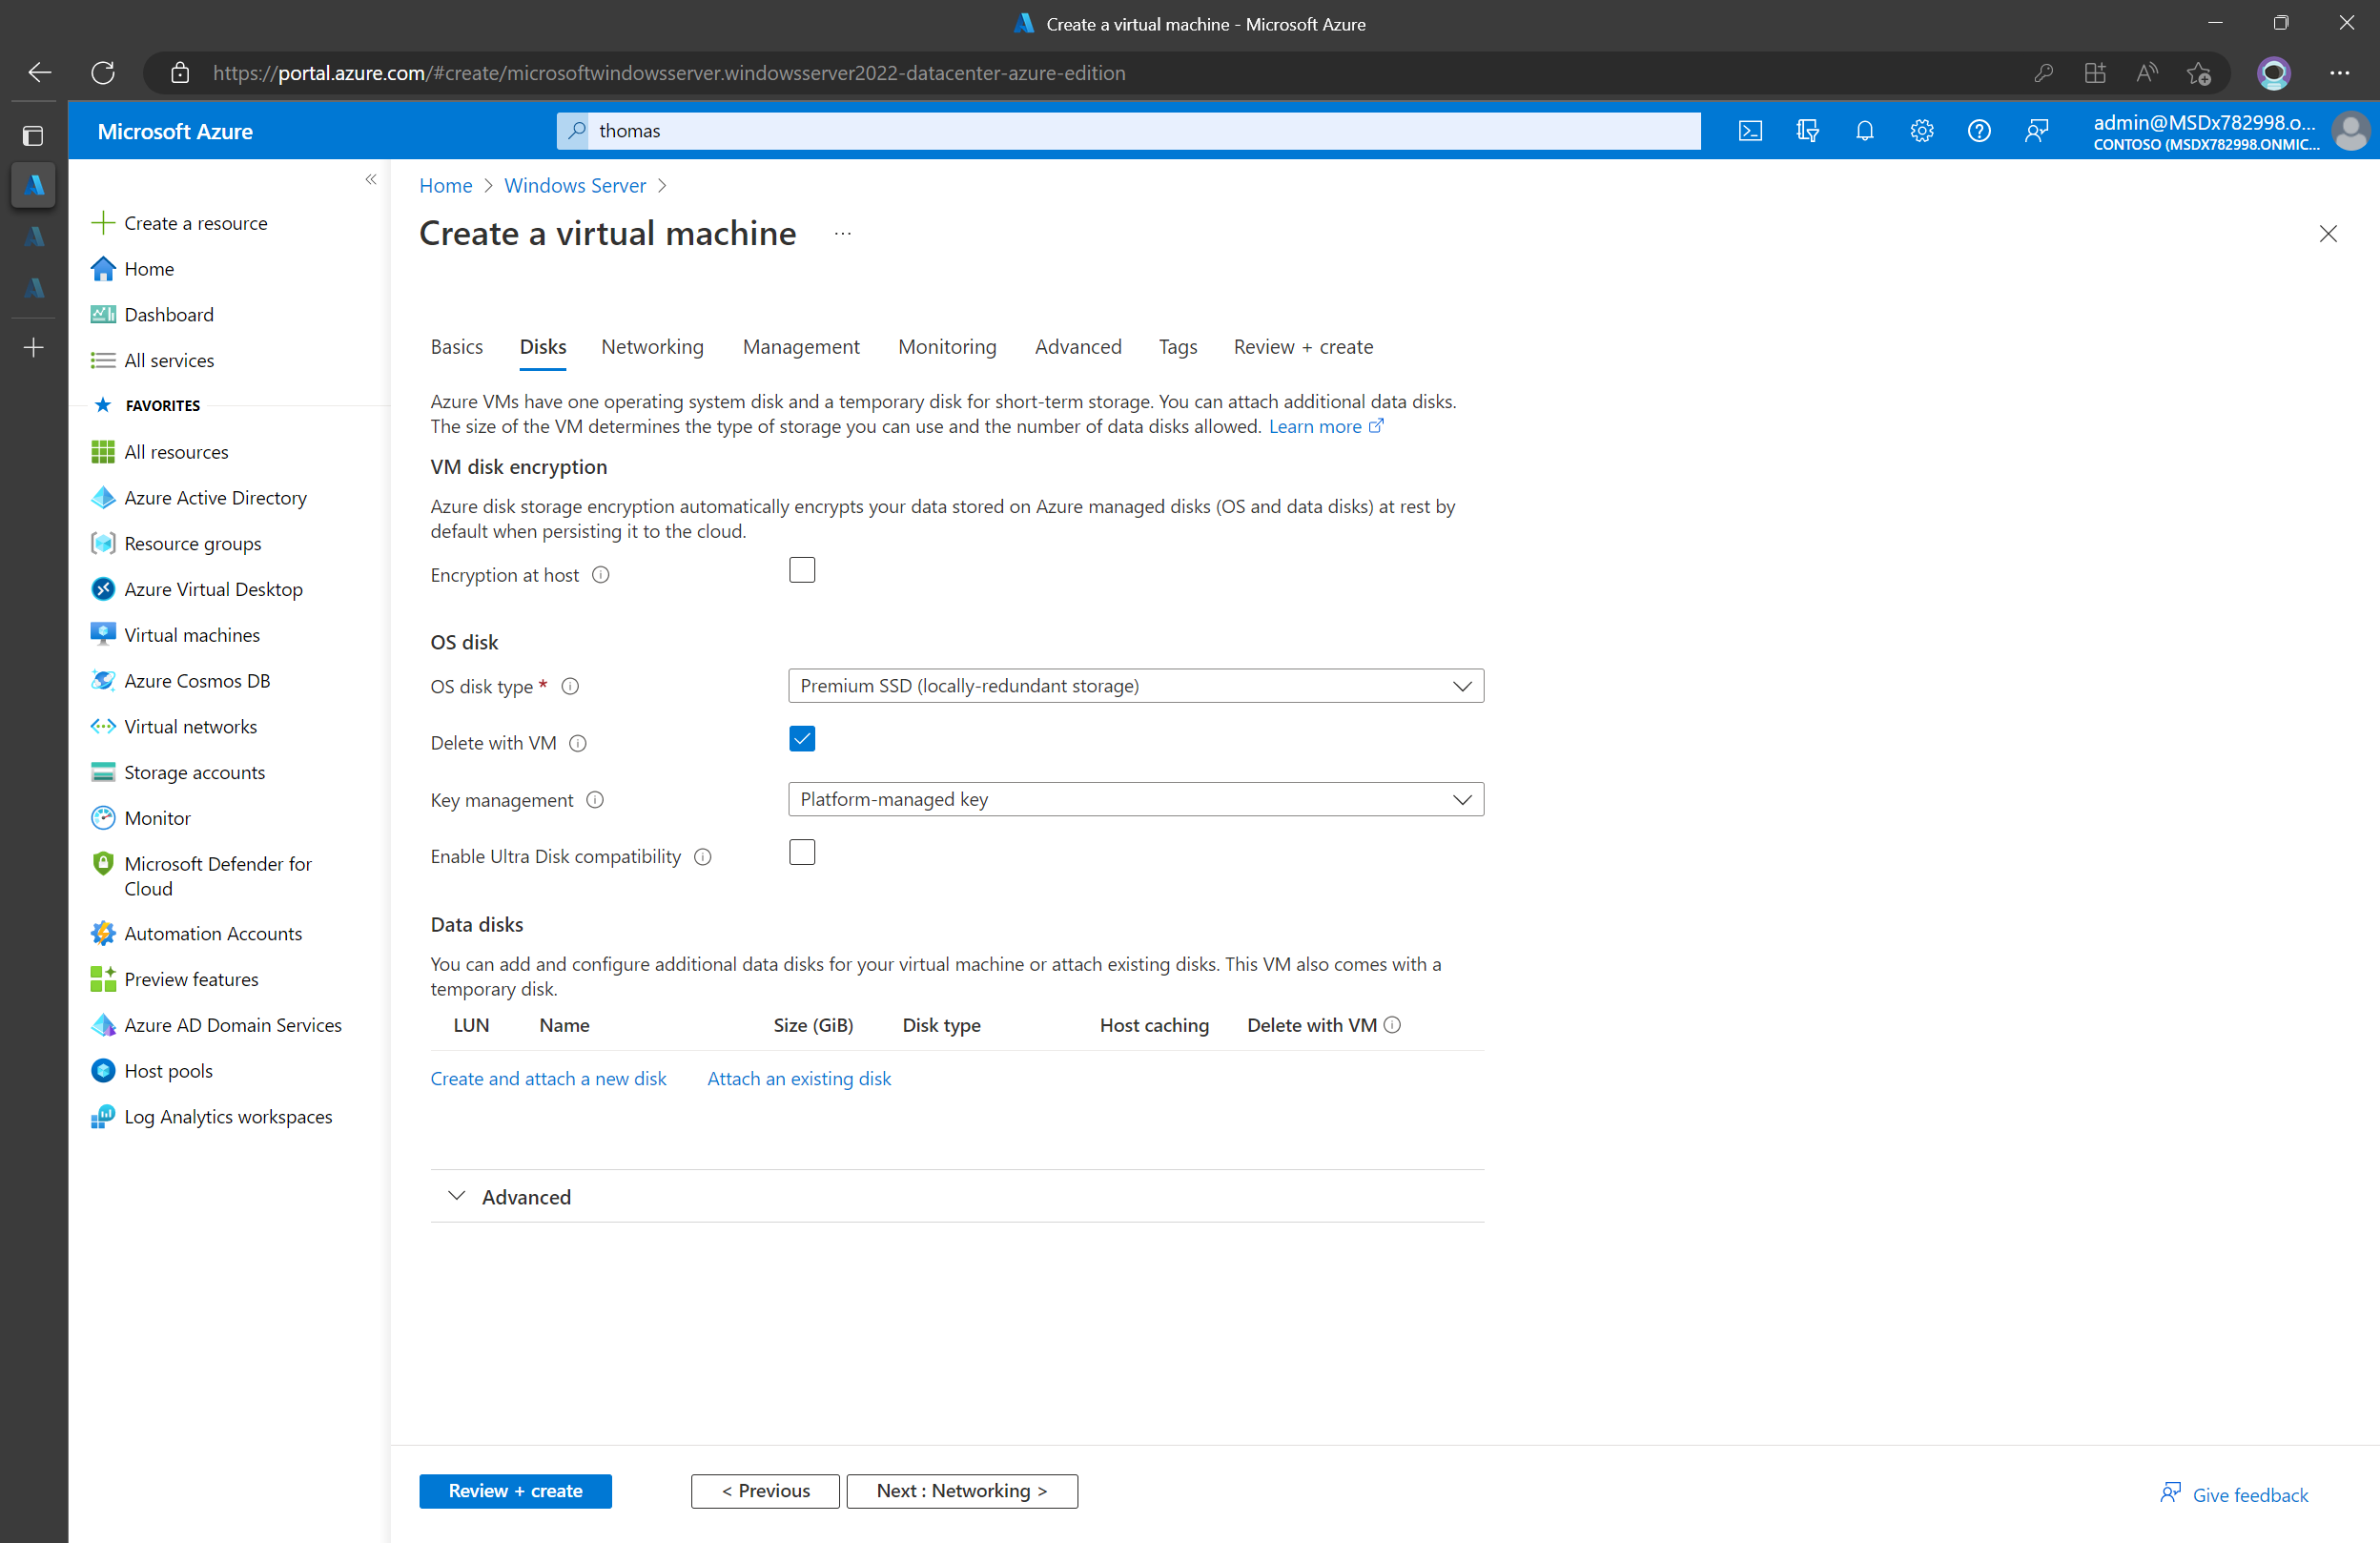
The next page is the disks options. When you set up a Virtual Machine (VM) on Azure, you'll see some options for disks. When you're setting up your VM, you'll need to choose the size and type of hard drives you want to use. You can choose a faster hard drive if you need it, and you can also encrypt your hard drive and manage the keys to keep your data secure.
- The OS disk is the primary disk storing your OS.
- Disk type refers to the kind of hard drive that you're using. There are different types of hard drives, and some are faster than others. Premium SSD is one of the fastest types, but it's also more expensive.
- VM disk encryption means
- Key management is a way to manage the encryption keys. Think of it like a password for your encrypted hard drive. You can choose how to manage the keys, like storing them in a specific place or using a specific tool to manage them.
On the next page, you’ll notice there are some options for networking:
- Network interface
- Virtual network is like a private network that your VM is connected to. It lets your VM talk to other computers and services on the same network.
- Public IP: A public IP to be able to connect to your VM (for now… VMs can easily not be public facing and actually in most cases you wouldn’t want them to be).
- NIC security group decides what traffic is allowed to come in and out of your VM. The rules you set here will supersede any rules you apply to you VM, namely:
- Public inbound ports
- Select inbound ports is like choosing which doors you want to keep open. Some ports are used for specific things, like port 3389 is used for Remote Desktop Protocol (RDP), which lets you connect to your VM from another computer.
- Load balancing helps distribute the workload between different VMs so that no one VM gets overwhelmed.
I really suggest you have a deeper dive into Azure networking at some point. But for now, go ahead an create a new virtual network and Public IP. The rest you don’t have to worry about for now.

The Management page is where you can set up things that help you manage your VM. Overall, the Management page is where you can set up things that help you keep track of and control your VM. It's like having a toolbox with different tools to help you maintain your car or your bike. Here are some of the things you might see on this page:
- System assigned managed identity: Automatically creates an identity that authenticates the VM with other Azure resources without storing credentials on the VM.
- Login with Azure AD: Login with your AAD users instead of having to make local users.
- Backup: This is a way to create a copy of your VM so that you can restore it if something goes wrong. It's like having a spare key for your house in case you lose your main key.
- Diagnostics: This is a way to collect information about your VM's performance and behavior. You have access to a dictionary so you should know what that word means.
- Auto-shutdown: This is a way to automatically shut down your VM at a certain time. It's like setting an alarm clock to wake you up in the morning. I HIGHLY suggest using it to keep costs down. The annoying thing is there is no native solution for an auto-start but it’s fairly straight forward to make a Logic App set on a timer to do it for you. Hey! That gives me an idea for another low effort blog post!
- Guest configuration: This is a way to configure settings inside the VM, like what software is installed or how it's configured. It's like rearranging your room to make it more comfortable.
- Tags: This is a way to add labels to your VM so that you can organize and find it more easily. It's like putting a label on a folder to remind you what's inside.

The Monitoring page is where you can set up important tools to help you keep track of how your Virtual Machine is running on Azure. I’m going to keep going with the trend I’ve been following and go over it – but really you don’t have to worry too much about this right now.
- Alerts: This allows you to set up notifications to alert you when certain conditions are met, such as when CPU usage reaches a certain level or when disk space is running low. Azure provides some recommended alert rules that you can enable if you choose.
Diagnostics settings: This is where you can choose what data you want to collect about your Virtual Machine, like how much memory or storage it's using.
- Boot diagnostics: allows you to troubleshoot issues that occur during the boot process of your Virtual Machine. When boot diagnostics is enabled, Azure captures a screenshot of your Virtual Machine's console screen every few seconds during the boot process. This allows you to see any error messages that may appear and diagnose any issues that are preventing your Virtual Machine from starting up properly.
- Guest diagnostics: Allows you to collect data about the performance and behavior of your Virtual Machine while it's running. This data can include information about CPU usage, memory usage, and network traffic, among other things. By collecting this data, you can identify any performance bottlenecks or issues that are impacting the performance of your Virtual Machine.
And if I said don’t worry too much about diagnostics – definitely don’t worry about the next page.

But let’s go over it anyway.
- Extensions: Add features and automations to your Virtual Machine after you've deployed it.
- VM applications: Download and install different applications onto your Virtual Machine, so you can do more with it.
- Custom data: This lets you pass on any special configuration or scripts you need to your Virtual Machine when it's being set up. Examples can be running a script at startup or passing configuration files to install software.
- User data: This lets you pass on any data that your applications might need to use while your Virtual Machine is running.
- Performance (NVMe): Performance enchaing stuff that can help make your VM go brrrr especially when it comes to storage performance.
- Host: Azure Dedicated Hosts let you manage a physical server that's dedicated to your Azure subscription, which means you get more control over which VMs are on it and how it's maintained.
- Capacity reservations: Make sure you have the resources you need available for when you need them.
- Proximity placement group: And this helps make sure your resources are closer together in the same region, which can help make your applications run faster with better performance.

Tags… well, they’re used for tagging stuff. At this point, I’m just going to copy and paste what it says on the page:
Tags are name/value pairs that enable you to categorize resources and view consolidated billing by applying the same tag to multiple resources and resource groups.Learn more about tags
Note that if you create tags and then change resource settings on other tabs, your tags will be automatically updated.

But now we can finally get to the good stuff! Click create and let’s do this. Which can take some time… so grab a coffee, look at cat pics on reddit, up to you.
....
......
........

And it’s done! So go ahead and click on…
Go to resource.

And now you can start using your VM! And there are couple of ways ways you can connect to it. Bastion is a really awesome way of keeping your VMs safe by not having to open up any ports to the internet. Because let’s face it. The internet is full of assholes. But it’s pricey. So we’ll be using the good old fashioned Remote Desktop (RDP) for now

This next part might be a bit frustrating… Rage inducingly frustrating. See the bit that says:
“Checking network security group for inbound access from your client's IP address.”
Now my tenant is just a dev tenant so it doesn’t have crazy production level networking. But if you’re working in a brownfield environment (be it dev or prod) you might experience issues with that part. All depending on your Network Security Group (NSG) settings or something else entirely.

But for now let’s assume everything just works.

And then you can download your RDP file!

So the last thing to do is establish a remote desktop connection to it. I’ll let you figure out what the next steps are going to be.
And that’s it! Have fun with your new Windows Server VM!
But… If you opted for a Linux variant then you’ll obviously want to go with SSH. At least to begin with. Remember that Ubuntu jumpbox I set up to access in Azure to get into my home network? I’m lazy and like things to be simple so ended up setting it up with X11 so I can use RDP to get in.
